I work at a company where the presentation is supposed to be alost-but-not-really white, say, 90% R, 90% G, 100% B.
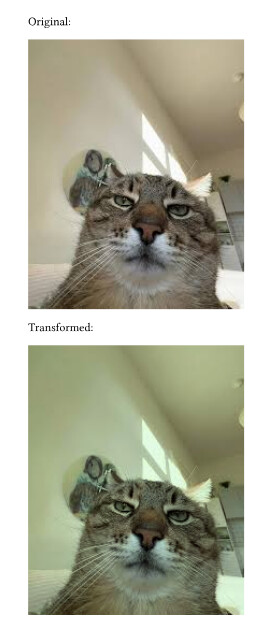
WhenI come across an image that has a white background (as default exported by matplotlib, other companies logo’s, etc) I can import them in a LaTeX presentation as:
and it will look as if the image creator gave it a transparent background.
In TikZ this is called ‘multiply’ (Transparency - PGF/TikZ Manual)
In python I would do this by multiplying the raw image data by (0.9, 0.9, 1.0) so that makes sense…
How could I do this in Typst?
I’m not very experienced in Rust but it looks like it should be a simple addition here:
Could I do this? I would be happy to add more features…
Yes, a simple per-channel multiplication is all I need. There is no alpha channel needed now, although, to generalize for other use cases a full matrix transform on the colors (SVG Basics Tutorials - Colour Transforms) would be a nice extra
If that’s all you need then you can just do operations on each channel individually. I see no reason why you couldn’t use matrix transformations:
let m = [
    [0.9, 0.0, 0.0],
    [0.0, 1.0, 0.0],
    [0.0, 0.0, 0.9],
];

for y in 0..res.height() {
    for x in 0..res.width() {
        let pixel = res.get_pixel_mut(x, y);
        let r = pixel[0] as f32;
        let g = pixel[1] as f32;
        let b = pixel[2] as f32;

        let nr = m[0][0]*r + m[0][1]*g + m[0][2]*b;
        let ng = m[1][0]*r + m[1][1]*g + m[1][2]*b;
        let nb = m[2][0]*r + m[2][1]*g + m[2][2]*b;

        pixel[0] = nr.clamp(0.0, 255.0) as u8;
        pixel[1] = ng.clamp(0.0, 255.0) as u8;
        pixel[2] = nb.clamp(0.0, 255.0) as u8;
    }
}
That looks great! So how does one open an image as a pixel array and how to show a pixel array as an image? I recall maybe seeing the latter somewhere, but not how to get the raw data out of an image… would be great if you could add that to your snippet :)
The snippet above is for a WASM plugin built in rust, I basically just yoinked the code I linked in my original response and edited the function that gets applied to each pixel. If you want to implement this yourself, it would probably be easier for both of us if you analyse the source code and see how they do it.
Thanks so far! I don’t really understand how Rust is installed on my system so not to brake anything I’m going to proceed causiously… but hopefully I can soon give this a try!
Sure, no worries. In my case I had trouble getting cargo to work correctly on my windows machine. If you are also using windows, I recommend installing WSL and working/compiling through the linux shell
Author of the grayness package here ;)
I did compile the wasm function on windows, but setup can indeed be a little tricky.
If there’s more interest, I could easily add per channel transforms or even matrix mutliplications to the package.
However, I still think stuff like this should be done in dedicated software for image-manipulation or even better directly while creating the images.
I should also note that these kinds of transforms could be done in directly in typst without the need of wasm plugins.
I have a Mac and rustc exists as a command, but rustup does not, which gives me an uncomfortable feeling I might break something if I install another rust. Anyway I think I have to reinstall my OS since the drive is bloated as well, but since I never did that with a Mac before I want to be totally sure all my backups have worked before I do that…
Anyway, thanks both for your contributions! I found that I can do what I wanted originally using ImageMagick:
Even nicer is actually making the image ‘as transparent as possible’ while keeping it looking the same against a white background:
magick input.png -alpha set -channel A -fx '1-min(min(r, g), b)' -channel R -fx '(r-1)/a+1' -channel G -fx '(g-1)/a+1' -channel B -fx '(b-1)/a+1' output.png
Surprisingly the internet was not very forthcoming in telling me how to do this so I had to tinker a bit until it worked…
Just out of curiosity (In case I need this on a computer with Typst but no ImageMagick); could you tell how this could be done in directly in Typst?
I would be inclined to mark this question answered (by the suggestion to use an external tool, such as imagemagick, as I am not able to recreate the rust-based suggestion), were it not that I am really curious about this:
I think that’s currently not really feasible, at least using grayness to help.
Typst supports raw image data, in which case it is super easy to treat groups of bytes as pixels and simply multiply them in some way. It would not be super performant, but it would work (and compared to doing the work once using magick, running grayness on every compilation is also not that great).
However, grayness does not, as far as I can tell, provide a way to return raw image data to Typst. Its write_image_buffer function (which is used whenever returning images to Typst) takes an ImageFormat and encodes the image accordingly. That means that the Typst code would have to handle image format specific decoding and decompression – just like when using read(encoding: none) directly – something that I would really not recommend.
In short: I think magick is indeed the solution here.
I’m not sure if I understand you correctly, but Grayness does expose the plg variable which lets you access the returned data as bytes. They are however already encoded, (depending on your input format, most often as PNG)
You meant that in Typst we can write a loop that achieves this:
however, that assumes that I have the raw data, so that I can easily apply that multiplication to an array of bytes. But since the plg module only works with encoded data, that means I’d have to decode png (or whatever) in Typst before writing my loop. Does that sound right?
So it would be much simpler if Grayness was able to return non-encoded image data instead – that is what I was expressing.
No, this is not how it works. After it’s merged there will be a deployment action running (but not after each merge?), which takes a while and can also fail. It looks like the average time is 20–30 minutes (Workflow runs · typst/packages · GitHub).