Hi everyone,
I’m experimenting with recreating a block-based programming style (like Scratch or Blockly) to visualize algorithms directly in Typst using CeTZ.
So far, I’ve managed to get a pretty good result by merging multiple paths. The tricky part was the small “notch” at the top of each block — that puzzle-piece connector. Without CeTZ, I couldn’t think of a clean way to draw it. Using grids alone works fine for simple layouts, but rounded corners and custom shapes get messy quickly, so I ended up drawing everything in CeTZ.
Before I go further, I’d love your thoughts on two things:
- Do you think this is a reasonable approach, or is there a smarter way to do it in Typst/CeTZ?
- How could I make the block’s height adjust automatically when more inner blocks are added?
CeTZ doesn’t play nicely with context or measure, since those return content instead of arrays, so I haven’t found a clean way to calculate the height dynamically.
I’ve attached:
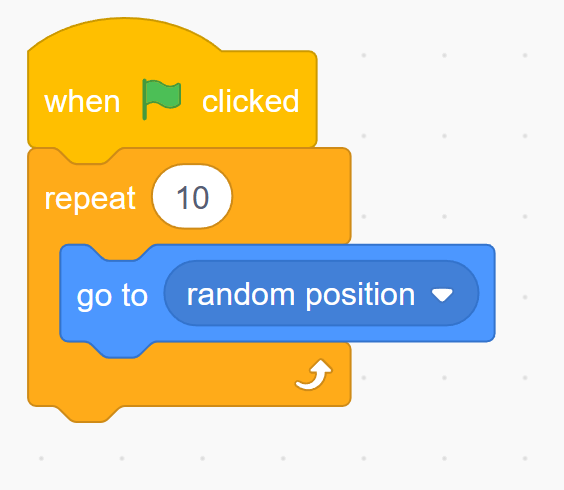
- a screenshot of the original layout I’m trying to mimic
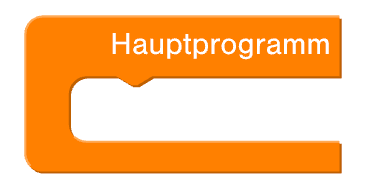
- a screenshot of my current CeTZ version
- and the code snippet I used
#import "@preview/cetz:0.4.2": *

#let stroke-width = 1pt
#let darken-amount = 25%
#let lighten-amount = 33%

#canvas(length: 1cm, {
  import draw: *
  let corner-radius = 3mm
  let arm-width = 0.75

  // Helper-Funktionen
  let x(dist) = line((), (rel: (dist, 0)))
  let y(dist) = line((), (rel: (0, dist)))

  let corner(from, to) = {
    let angles = (
      l: 180deg, // left
      r: 0deg, // right
      t: 90deg, // top
      b: 270deg, // bottom
    )
    arc((), anchor: "start", start: angles.at(from), stop: angles.at(to), radius: corner-radius)
  }

  let nase = {
    line((), (rel: (0.25, -0.15)))
    line((), (rel: (0.1, 0)))
    line((), (rel: (0.25, 0.15)))
  }

  let hauptprogramm(height: 5, body) = {
    merge-path(
      fill: rgb("#FF8001").darken(darken-amount),
      stroke: none,
      {
        corner("t", "l")
        y(-height)
        corner("l", "b")
        x(5)
        y(0.5)
        x(-5 + arm-width)
        corner("b", "l")
        y(height - 1.5)
        corner("l", "t")
        x(0.5)
        nase
        x(3.15)
        y(1)
      },
      close: true,
    )
    translate((-1pt, 1pt))
    merge-path(
      fill: rgb("#FF8001"),
      stroke: none,
      {
        content((0, 0), [])
        corner("t", "l")
        y(-height)
        corner("l", "b")
        x(5)
        y(0.5)
        line((), (rel: (-5 + arm-width, 0)), name: "bottom-arm-top")
        corner("b", "l")
        y(height - 1.5)
        corner("l", "t")
        x(0.5)
        nase
        x(3.15)
        y(1)
      },
      close: true,
    )
    translate((0pt, 0.2pt))
    merge-path(
      stroke: (paint: rgb("#FF8001").lighten(lighten-amount), thickness: stroke-width),
      {
        line((5, 0), (rel: (-5cm + 0.5pt, 0)))
        corner("t", "l")
        y(-height)
        arc((), anchor: "start", start: 180deg, stop: 270deg - 45deg, radius: corner-radius)
      },
    )
    merge-path(
      stroke: (paint: rgb("#FF8001").lighten(lighten-amount), thickness: stroke-width),
      {
        line((rel: (0, 0), to: "bottom-arm-top.start"), (rel: (0, 0), to: "bottom-arm-top.end"))
        arc((), anchor: "start", start: 270deg, stop: 270deg - 45deg, radius: corner-radius)
      },
    )
    content((3, -0.5), text(font: "Nimbus Sans", white, 15pt, [Hauptprogramm]))
  }
  hauptprogramm(height: 2, box(height: 3cm, width: 4cm, fill: green, radius: 3mm))
})
In LaTeX, there’s actually a dedicated package for Scratch 3 blocks (scratch3 on CTAN), which inspired me to try building something similar in Typst.
Really curious how you’d approach this!
Thanks,
Alex