Hi!
Would anyone know how to replicate something like this?
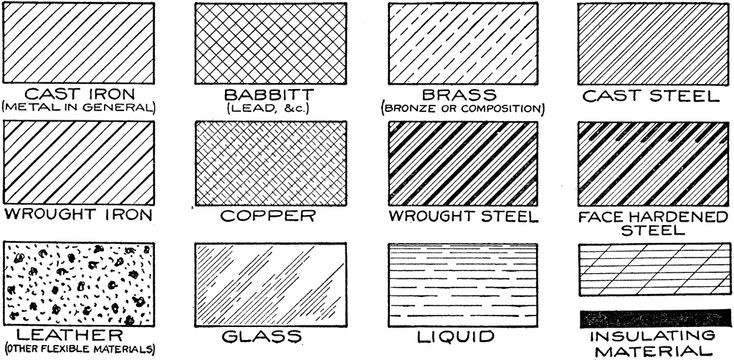
Source: Mechanical Drawing Cross Hatching of Material Symbols | ClipArt ETC
Specifically, the cast iron (top left)
Kind regards
Hi!
Would anyone know how to replicate something like this?
Specifically, the cast iron (top left)
Kind regards
There is a pattern type for repeated fillings: Pattern Type – Typst Documentation
I’m not sure it would help with all of these, but the repeating ones (those except for face hardened steal, leather, glass) should be possible by creating a pattern. Since I assume the others will/are allowed to eventually repeat as well, you could probably also do those. Face hardened steel and glass may require separate patterns for “edge” and “bulk area” since they’re not uniform.
Thanks!
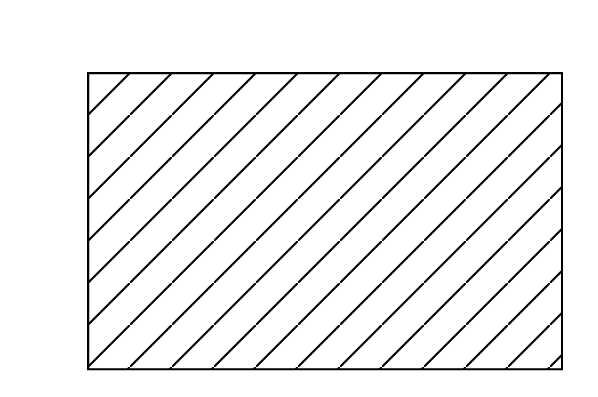
I got this now:
#let pat = pattern(size: (20pt, 20pt))[
  #place(line(start: (0%, 100%), end: (100%, 0%)))
]

#rect(fill: pat, width: 8cm, height: 5cm, stroke: 1pt)
So now I want to do two things:
I hope someone knows how :)
Hi @AhmedSalih,
one way to do achieve individual renderings for a block could be the layout()-function:
// given you'd want to fill this block
#rect(width: 8cm, height: 5cm)[
  #context layout(size => {
    size
    // Individual line calculations and
    // drawings here, using size
  })
]
I haven’t done this (drawing patterns) yet and i don’t know how performant such an approach is.
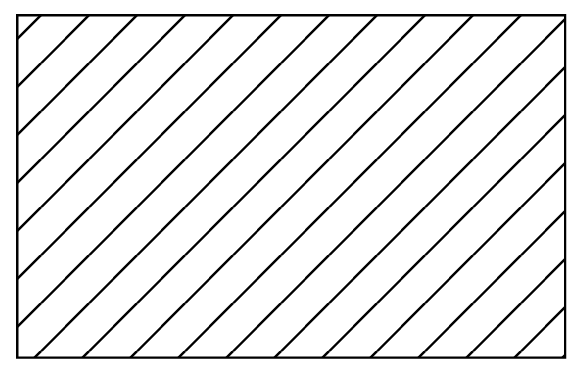
problem 1: the locations where the line is “interrupted” is where four tiles come together. your pattern has black at the top right and bottom left corners, but not at the top left and bottom right corners. You can fix that by adding some lines that fill these few pixels:
#let pat = pattern(size: (20pt, 20pt), {
  place(line(start: (0%, 100%), end: (100%, 0%)))
  place(line(start: (50%, 150%), end: (150%, 50%)))
  place(line(start: (-50%, 50%), end: (50%, -50%)))
})

#rect(fill: pat, width: 8cm, height: 5cm, stroke: 1pt)
It doesn’t matter here, but another source of “too short” lines could be the stroke’s cap: square and round caps will extend beyond the end according to the thickness, filling some parts of the pattern that may otherwise be missing.
I don’t know about problem 2; there’s pattern.relative but it doesn’t support what you need. I think pattern could sensibly get an “alignment” that defines where the pattern fill is originating from. You could open an issue about it.
For your first problem, I would recommend using the modpattern package, which gets rid of the gaps automatically. To then move the lines, you could use the move function. This doesn’t flip the diagonal direction, but it still allows you to adjust the positioning of the lines.
#import "@preview/modpattern:0.1.0": modpattern

#let pat = modpattern((20pt, 20pt))[
  #move(dx: 50%, line(start: (0%, 100%), end: (100%, 0%)))
]

#rect(fill: pat, width: 8cm, height: 5cm, stroke: 1pt)
Thank you all!
This was exactly what I needed.
Kind regards