Introduction
I am working on a Typst–Package called Frame-It.
It enables creating different kinds of frames around parts of your text to highlight them on one hand, but also give a categorical hint to the viewer of what kind of information to expect in a frame.
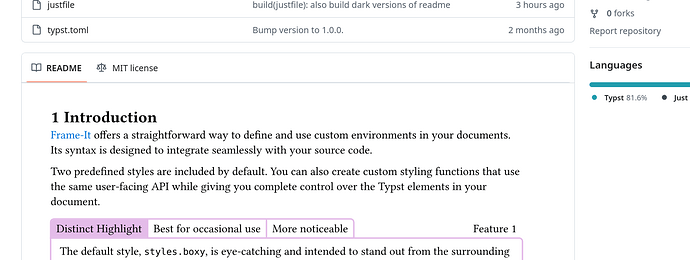
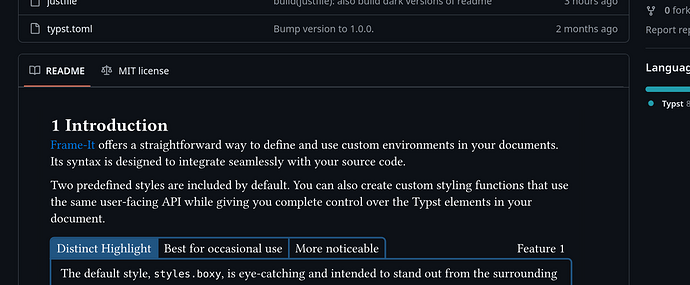
I am particularly proud of how I am managing the Readme of the project.
It took me quite some time to figure out how to be able to write the Readme in typst but also support the dark mode on GitHub instead of burning everyones eyes whenever they open my project after 8pm.
In this post, I want to explain how I am doing it this in the hopes of receiving feedback and opinions on how it looks/works and weather you have ideas to improve it.
As a matter of fact, the nature of my package is aiding in presenting information in a digestible manner.
Naturally, the techniques it provides are very apt to be used in a project–Readme.
At the same time, writing and compiling the Readme of my project from Typst has two advantages:
- It is the ideal platform to showcase the features the package provides in a real–world manner
- I add a section at the end with edge cases of how these frames can be used.
This way, the readme automatically serves as a testing ground for the functionality
while also proudly showcasing the state of how polished the package is.
However, I encountered some roadblocks along the way.
Compiling the Readme from Typst | How it works
The Readme itself consists just of a few lines of html.
The html is required to later accommodate dark mode and multiple pages I need to generate for testing.
For the longest time, the file used to consist of just one line:

Here, the  syntax means embed the file into the document instead of just linking to it.
Second, I use the https://raw.githubusercontent.com/–url in order to receive the document as media type svg so I can embed it properly.
Note in case you want to copy this approach, you need to replace my GitHub–username with yours.
Lastly, my current approach is to use an orphaned branch in my repo called assets like described here: https://gist.github.com/mcroach/811c8308f4bd78570918844258841942.
I use this branch to push the svg file which my Typst–Readme compiles to.
Now, in order to actually compile the file (which I named README.typ) and update the contents on GitHub, I wrote a few Just recipes to do that:
set unstable
readme-typ-file := 'README.typ'

# –––––– [ Setup ] ––––––
setup: _add-assets-to-git-exclude
    git worktree add assets

[confirm("Add new worktree 'assets' to '.git/info/exclude'?")]
_add-assets-to-git-exclude:
    echo assets >> .git/info/exclude

# –––––– [ Readme ] ––––––
push-new-readme: (readme-compile-svgs) && commit-and-push-assets

[confirm("Do you want to commit and push all changes on the assets branch?")]
[script]
commit-and-push-assets commit-msg="Update.":
    cd assets
    git add .
    git commit -m {{commit-msg}}
    git push

readme-watch:
    typst watch {{readme-typ-file}}

readme-compile theme="light":
    typst compile --input theme={{theme}} {{readme-typ-file}}

readme-compile-svgs:
    typst compile -f svg {{readme-typ-file}} assets/README-{p}.svg
    typst compile -f svg --input theme=dark {{readme-typ-file}} assets/README-dark-{p}.svg
Here, readme-watch and readme-compile are just for local development.
Next, the _add-assets-to-git-exclude adds a new folder to the repo root which hosts the assets branch.
Since we add it to the locat git-exclude, it won’t show up on GitHub.
Lastly, the actual work happens in readme-compile-svgs.
To do a little bit of foreshadowing, this actually compiles two versions of the document and places them in the assets folder – one light and one dark version.
On top of that, the output path includes a page–pattern {p}.
This is only needed if the file contains multiple pages.
If it weren’t for these two facts, the following recipe would suffice:
readme-compile-svgs:
    typst compile -f svg {{readme-typ-file}} assets/README.svg
Document Configuration
On the typst side, it does not need a lot in order to get the approach working.
These are the first line of my version:
#set page(height: auto, margin: 4mm)
#set text(14pt)
The most important one is to set page(height: auto) so it only generates one contiguous page (i.e. svgs) instead of lots.
Also, I trimmed down the margis because I did not like the wasted space of the default margins.
Setting the width: auto might also work, though it conflicted with the rendering of my specific package.
Initially, these steps ought to be enough to get up and running.
If something ends up not working still or if the explanations are fishy at times, feel me to write me or comment on this post.
The biggest flaw of this design for me was not supporting dark mode on GitHub.
The white background was very glaring for the eyes.
Following, I want to show how I addressed this issue (copying the approach the repository https://github.com/Jollywatt/typst-fletcher.
Dark Mode
Fundamentally, we have two problems to solve.
The first concerns how to be able to compile two versions of our document.
The second problem is how to display the right version on GitHub.
Let’s first look at the latter.
It turns out that the following code snippet chooses the right version based on the theme:
<picture>
  <source media="(prefers-color-scheme: dark)" srcset="https://raw.githubusercontent.com/marc-thieme/frame-it/refs/heads/assets/README-dark-1.svg">
  <img src="https://raw.githubusercontent.com/marc-thieme/frame-it/refs/heads/assets/README-1.svg">
</picture>
So given two according versions of our Readme, we can just reference the right one in the snippet and are good to go.
Second, we want to compile different versions of our document.
First, you want to think about how to turn your document dark.
Most of the time, this will just be a matter of setting the text color to white and the background to dark.
For GitHub dark theme, I recommend the color value #0d1117 to match the dark GitHub background on Desktop and rgb(240, 246, 252) to match the text color.
#set text(white)
#set page(fill: "#0d1117")
Now, I show you how to switch the designs based on the version we’re compiling.
As you saw before, the just–recipe actually looks like this:
readme-compile-svgs:
    typst compile -f svg {{readme-typ-file}} assets/README.svg
    typst compile -f svg --input theme=dark {{readme-typ-file}} assets/README-dark.svg
As you can see, for the dark version, we are renaming the file to README-dark.svg
and we are passing --input theme=dark as a CLI parameter.
According to the documentation,
these parameters will be available as a dictionary under sys.inputs in your document.
Therefore, all that’s left to do is differentiate the two cases dynamically:
#let text-color = black
#let background-color = white
#if sys.inputs.at("theme", default: "light") == "dark" {
  text-color = rgb(240, 246, 252)
  background-color = rgb("#0d1117")
}
#set text(text-color)
#set page(fill: background-color)
The #set–rule needs to be outside of the if–statement in order to take effect.
As a bonus tip, when I wanted some sorts of gray color which works for both styles,
I often used this expression using a context expression to get the color:
context text.fill.mix((text.fill.negate(), 20%))
Multiple Pages
In my special case, I wanted to test the behavior of my package on pagebreaks.
This created a problem because typst exports each page as a single svg file.
To accommodate for that, I added the page template {p} to the output file (assets/README-{p}.svg).
For lack of a more elegant solution, I just pasted the above pattern a few times referencing the correct page.
Also, I added this gray line to indicate pagebreaks: <hr style="background-color: light-gray;">
Final Thoughts
In the end, I am very happy with the result.
Especially in dark mode, I think it blends in very nicely now.
In my opinion, writing the Readme in native GitHub markdown still looks nicer of course.
However, when one has a lot of typst snippets to embed like me, I think this approach is a nice tradeoff.
Alternatively, you could of course also automate the embedding like here: https://github.com/Jollywatt/typst-fletcher/blob/master/scripts/readme.nu.
Altough his adds complexity as well. In the end, its a tradeoff.
Plain text links due to link limit on the forum:
- My Readme:
https://github.com/marc-thieme/frame-it/blob/main/README.md?plain=1 - When the Readme was just one line:
https://github.com/marc-thieme/frame-it/blob/265c9c5f558223bd8e9a9d7e2e80cf8ef83330a9/README.md?plain=1 - Justfile:
https://just.systems/man/en/ - Repo with dark mode and scripts:
https://github.com/Jollywatt/typst-fletcher - Typst
sys.inputsDocs:https://typst.app/docs/reference/foundations/sys/ - Typst context expressions:
https://typst.app/docs/reference/context/

