How to distribute column widths equally for specific rows in a table

Hi everyone,

I’m trying to create a taxonomy table in Typst that has two main parts per row:

  1. A dimension column on the left: same layout for every row.
  2. A characteristics section on the right: varies per row in terms of how many columns are needed.

I am trying to achieve that the dimension column should keep its width automatically based on the text. For the characteristic columns, the remaining space should be equally distributed for each row.

In Word, it’s quite simple:

  • Create a table with the max number of columns,
  • Merge any extra cells in rows with fewer characteristics,
  • Select the relevant cells and click “Distribute Columns”. Word automatically spreads the content evenly across the available space. Here is how it should look (the relevant part is marked red):

I’d like to replicate this behavior in Typst but I am a new user. I’ve experimented with table(), but I’m struggling to automatically size the first (dimension) column and then equally divide the remaining space per row based on how many characteristic cells exist in that row. Also, some cells use rotated (90°) text, which adds to the layout complexity.

Is there a way to:

  • Use auto width for the first column,
  • Dynamically calculate and distribute the remaining width across a variable number of columns per row?

Here is a simplified example of what I’m currently working with:

#show table: set text(9pt)
#pad(x: -3.5em,
    table(
        columns: 8,
        align: center + horizon,
        stroke: 0.5pt,
        table.cell(colspan: 3, fill: black, text([*Dimension*], fill: white)),
        table.vline(start: 1, stroke: 1pt),
        table.cell(colspan: 5, fill: black, text([*Characteristic*], fill: white)),
        table.cell(rowspan: 6, rotate(-90deg, reflow: true,[Technical])),
        table.cell(rowspan: 3, rotate(-90deg, reflow: true,[Interaction])),
        [*Input*],
        [Text],
        [Image],
        [Audio],
        table.cell(colspan: 2)[Video],
        [*Output*],
        [Text],
        [Image],
        [Audio],
        [Video],
        [3D-Model],
        [*Interface*],
        [Web],
        [Mobile],
        [Desktop],
        [API],
        [Integrated],
        table.cell(rowspan: 2, rotate(-90deg, reflow: true,[Work])),
        [*Type of task*],
        [Information processing],
        [Problem solving],
        [Social],
        table.cell(colspan: 2)[Physical],
        [*Method*],
        [Autonom],
        [Teamwork],
        table.cell(colspan: 3)[Routine],
        table.cell(rowspan: 1, rotate(-90deg, reflow: true,[Use cases])),
        [*AI use*],
        [Generation of text],
        [Programming],
        [Translation],
        [Research and education],
        [Inspiration and creativity],
    )
)

This would be the current output:

Any suggestions or examples would be greatly appreciated! Thanks in advance.

You could use a grid for each row of the column of distributed cells. You would then treat everything as a single cell from the perspective of the table. This allows you to distribute the cells without measuring anything (other than the number of cells/elements in each row).

Some notes/warnings and things I have noticed so far:

  1. You have to share the style of the table with the grid inside the function distributed-cells(). This is not an issue as long as you use variables for align, stroke, inset etc…
  2. The outer stroke of the distribute cells is currently drawn by the table and the grid. I don’t know if my brain is playing tricks on me here, but it does look like the lines are too thick. If that is bothering you as well, you can only draw the inner lines in the grid.
  3. Currently the table will collapse if your page width is set to auto since both the column widths inside the grid and the width of the column “Characteristic” in the table use the fractional length 1fr. This will not be an issue if your paper size is set to A4 or if you are wrapping the table in a block to specify the width.
#let distribute-cells(..cells) = table.cell(inset: 0pt,
  grid(
    columns: (1fr,) * cells.pos().len(),
    align: center + horizon,
    stroke: 1pt,
    inset: 5pt,
    ..cells,
  )
)

#table(
  columns: (auto, 1fr),
  align: center + horizon,
  stroke: 1pt,
  table.header("Dimension", "Characteristic"),
  "Input", distribute-cells("Text", "Image", "Audio", "Video"),
  "Output", distribute-cells("Text", "Image", "Audio", "Video", "3D-Model"),
  "Type of task", distribute-cells("Information processing", "Problem solving", "Social", "Physical"),
)

1 Like

Hello. Have you looked at How to post in the Questions category?

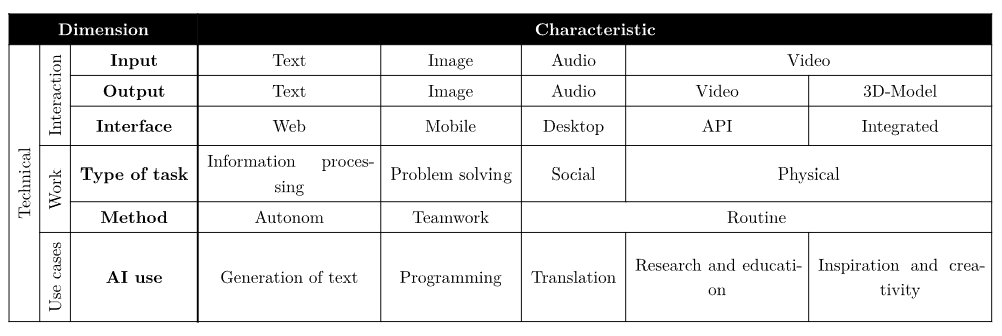
Since table cell dimensions are soft, by default you can’t fill cell’s full height by stretching inner content, as it will just stretch the parent cell. You can provide it a point of reference to patch this, which is a compromise, but the implementation is very simple:

#set page(margin: 1cm)
#show table: set text(9pt)

#let sideways = rotate.with(-90deg, reflow: true)
#let subtable(tallest: none, ..args) = table.cell(inset: 0pt, context {
  let rows = auto
  if tallest != none { rows = measure(tallest).height + table.inset * 2 }
  layout(size => table(
    columns: (1fr,) * args.pos().len(),
    rows: rows,
    table.hline(stroke: 0pt),
    ..args,
    table.hline(stroke: 0pt),
  ))
})


// Will break nested tables, can be fixed with grids.
// #show table.cell.where(y: 0): strong
// #show table.cell.where(y: 0): set text(white)

// For nested tables to look the same.
#set table(align: center + horizon, stroke: 0.5pt)

#table(
  columns: 4,
  table.header(
    table.cell(colspan: 3, fill: black, text(white)[*Dimension*]),
    table.cell(fill: black, text(white)[*Characteristic*]),
  ),
  table.cell(rowspan: 6, sideways[Technical]),
  table.cell(rowspan: 3, sideways[Interaction]),
  [*Input*],
  subtable([Text], [Image], [Audio], [Video]),
  [*Output*],
  subtable([Text], [Image], [Audio], [Video], [3D-Model]),
  [*Interface*],
  subtable([Web], [Mobile], [Desktop], [API], [Integrated]),
  table.cell(rowspan: 2, sideways[Work]),
  [*Type of task*],
  subtable([Information processing], [Problem solving], [Social], [Physical]),
  [*Method*],
  subtable([Autonom], [Teamwork], [Routine]),
  table.cell(rowspan: 1, sideways[Use cases]),
  [*AI use*],
  subtable(
    tallest: sideways[Use cases],
    [Generation of text],
    [Programming],
    [Translation],
    [Research and education],
    [Inspiration and creativity],
  ),
)

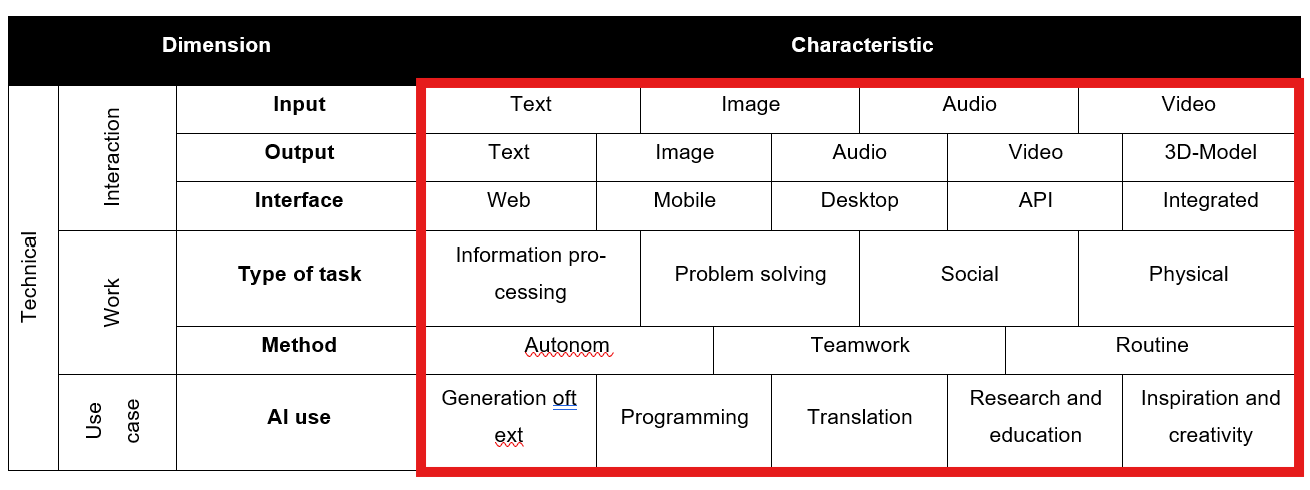
Without tallest point of reference, it will look like this:

This works for width because of point 3 in How to distribute column widths equally for specific rows in a table - #2 by janekfleper.

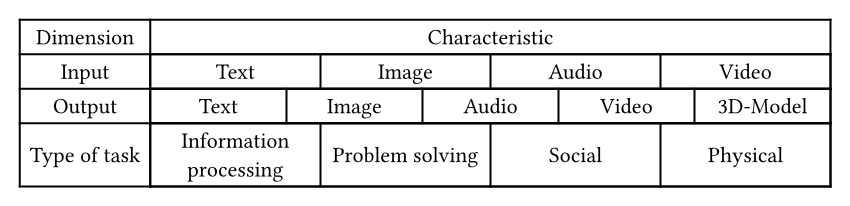
But I have a spreadsheet-like document where I want to cross some cells. There is a trick that @Tinger showed me a long time ago. You can pin cell corners without disturbing it, and then use the concrete location data for absolute anchoring. This way, it becomes trivial to get the current cell’s height:

#let make-label(counter, alignment, n: auto) = {
  assert(alignment in (top, bottom))
  let counter-name = repr(counter).split("\"").at(1)
  let alignment-str = repr(alignment)
  let n = if n == auto { str(counter.get().first()) } else { str(n) }
  label(counter-name + "." + n + "." + alignment-str)
}

#let cell-counter = counter("cell-counter")

#let pin-corner(counter, alignment) = context {
  place(alignment)[#metadata(none)#make-label(counter, alignment)]
}

#let pin-top-bottom(counter) = {
  pin-corner(counter, top)
  pin-corner(counter, bottom)
}

#let cross-cell(counter, body, ..args) = table.cell(
  counter.step() + pin-top-bottom(counter) + body,
  ..args,
)

#let get-pinned-corners(counter) = {
  let cell-inset = if table.cell.inset == auto { 5pt } else { cell.inset }
  let adjusted-position(pos, alignment) = {
    (pos.x - page.margin, pos.y - page.margin)
  }
  let n = counter.get().first()
  let (top, bottom) = (top, bottom).map(alignment => {
    adjusted-position(
      locate(make-label(counter, alignment, n: n)).position(),
      alignment,
    )
  })
  (top.last(), bottom.last())
}

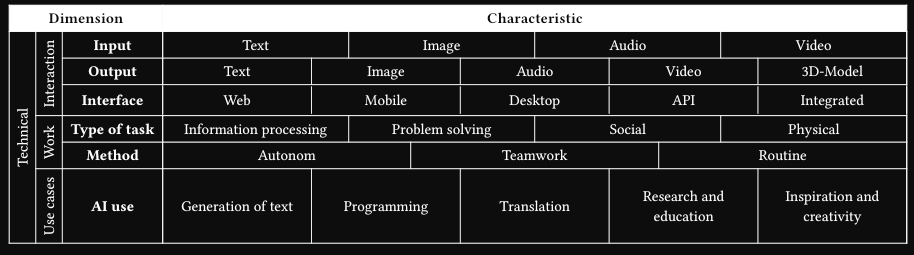
Now using cross-cell and get-pinned-top-bottom-y:

#let subtable(..args) = cross-cell(inset: 0pt, cell-counter, context {
  let (y1, y2) = get-pinned-top-bottom-y(cell-counter)
  layout(size => table(
    columns: (1fr,) * args.pos().len(),
    rows: y2 - y1,
    table.hline(stroke: 0pt),
    ..args,
    table.hline(stroke: 0pt),
  ))
})

And you get the same result, fully automatically.

Full example
#set page(margin: 1cm)
#show table: set text(9pt)

#let make-label(counter, alignment, n: auto) = {
  assert(alignment in (top, bottom))
  let counter-name = repr(counter).split("\"").at(1)
  let alignment-str = repr(alignment)
  let n = if n == auto { str(counter.get().first()) } else { str(n) }
  label(counter-name + "." + n + "." + alignment-str)
}

#let cell-counter = counter("cell-counter")

#let pin-corner(counter, alignment) = context {
  place(alignment)[#metadata(none)#make-label(counter, alignment)]
}

#let pin-top-bottom(counter) = {
  pin-corner(counter, top)
  pin-corner(counter, bottom)
}

#let cross-cell(counter, body, ..args) = table.cell(
  counter.step() + pin-top-bottom(counter) + body,
  ..args,
)

#let get-pinned-top-bottom-y(counter) = {
  let cell-inset = if table.cell.inset == auto { 5pt } else { cell.inset }
  let adjusted-position(pos, alignment) = {
    (pos.x - page.margin, pos.y - page.margin)
  }
  let n = counter.get().first()
  let (top, bottom) = (top, bottom).map(alignment => {
    adjusted-position(
      locate(make-label(counter, alignment, n: n)).position(),
      alignment,
    )
  })
  (top.last(), bottom.last())
}

#let sideways = rotate.with(-90deg, reflow: true)
#let subtable(..args) = cross-cell(inset: 0pt, cell-counter, context {
  let (y1, y2) = get-pinned-top-bottom-y(cell-counter)
  layout(size => table(
    columns: (1fr,) * args.pos().len(),
    rows: y2 - y1,
    table.hline(stroke: 0pt),
    ..args,
    table.hline(stroke: 0pt),
  ))
})


// Will break nested tables, can be fixed with grids.
// #show table.cell.where(y: 0): strong
// #show table.cell.where(y: 0): set text(white)

// For nested tables to look the same.
#set table(align: center + horizon, stroke: 0.5pt)

#table(
  columns: 4,
  table.header(
    table.cell(colspan: 3, fill: black, text(white)[*Dimension*]),
    table.cell(fill: black, text(white)[*Characteristic*]),
  ),
  table.cell(rowspan: 6, sideways[Technical]),
  table.cell(rowspan: 3, sideways[Interaction]),
  [*Input*],
  subtable([Text], [Image], [Audio], [Video]),
  [*Output*],
  subtable([Text], [Image], [Audio], [Video], [3D-Model]),
  [*Interface*],
  subtable([Web], [Mobile], [Desktop], [API], [Integrated]),
  table.cell(rowspan: 2, sideways[Work]),
  [*Type of task*],
  subtable([Information processing], [Problem solving], [Social], [Physical]),
  [*Method*],
  subtable([Autonom], [Teamwork], [Routine]),
  table.cell(rowspan: 1, sideways[Use cases]),
  [*AI use*],
  subtable(
    [Generation of text],
    [Programming],
    [Translation],
    [Research and education],
    [Inspiration and creativity],
  ),
)
2 Likes

Thank you both very much for your quick and detailed answers!

I had time to go through both examples, and I think @Andrew’s solution is the most robust since it handles the borders correctly and flexible in terms of height as well. I have two follow-up questions regarding this approach:

  1. Does your solution only work if the table is placed on a separate page, or is it also possible to embed the table between regular text?
  2. I’m also having trouble adapting the page setup to use my own margins. In your example, you set all margins to 1cm, but when I try to use my own custom setup, I get the error: Cannot subtract dictionary from length.

Here’s the page setup I’m using in my main.typ file (now correctly formatted, sorry about before):

#set page(
  margin: (top: 2.5cm, bottom: 2cm, left: 2.5cm, right: 3cm),
  header: context {
    if counter(page).get().first() > 1 [
      #set text(10pt, baseline: 8pt)
      #set align(right)
      Seite
      #counter(page).display()
    ]
  }
  + if counter(page).get().first() > 1 [
    #line(
    length: 100%,
    stroke: 0.5pt)
  ]
)

Any ideas on how I can adapt the margin settings in your solution to work with my own page configuration?

Thanks again for your support, I really appreciate it!

First of all, did you skip How to distribute column widths equally for specific rows in a table - #3 by Andrew? Your code blocks clearly don’t use correct syntax highlighting.


It doesn’t matter if there is text around or not. It might even work when row cells are split across pages. Actually, no. The y coordinates are from different pages, so the difference will make the row height very big. But I guess it can be also handled.

Just change the margin reference to your margin setup:

(pos.x - page.margin, pos.y - page.margin)
1 Like

Sorry again for the formatting issues, I think I’ve got it now.

Thank you very much for your tips. I was able to adjust the margins as needed, and the table now splits nicely across pages. The only thing still missing is that the 90-degree rotated texts aren’t repeated on new pages, but I don’t really care.

I just have one last question:
Currently, all the text in the table cells is justified, which I’d like to avoid. I tried using:

#show table: set par(justify: false)

However, this causes the text inside the table cells to not wrap properly anymore.

Is there a way to disable justification while still allowing the text to wrap correctly inside the cells?

1 Like

Does any other program duplicates cell’s content when split between pages? You can ask to add this.

text.hyphenate

1 Like

This did the trick, I just had to add:

#set text(hyphenate: true)

Thank you again for your great support, you helped me a lot!

1 Like